
Most veneer cases that disappoint were decided before the porcelain was ever made. Anterior veneer prep is where a case is set up to succeed or quietly set up to fail, and the mistakes are rarely dramatic. A little too much reduction here, a margin in the wrong place there, and a preparation cut to the tooth in front of you instead of to the result you were trying to create.
Design the final result first, then prepare to that design rather than to the existing tooth. Stay in enamel wherever you can, because bonding to enamel is substantially more predictable than bonding to dentin. Use depth cuts through a mock-up so your reduction is measured from where the veneer will actually sit. Keep margins on enamel with a defined chamfer, round every line angle, and reduce the minimum the case genuinely requires. When the teeth are already undersized or retruded, minimal or no preparation may be the correct answer.
Design First, Cut Second
The single biggest shift in thinking for dentists new to veneers is that preparation is not something you do to a tooth. It is something you do relative to a plan.
If a tooth already sits where the final veneer needs to be, you may remove very little. If it is rotated or protrusive, you may remove more from one area and almost nothing from another. Cutting a uniform amount off every tooth ignores that, and it is how enamel gets removed that the case never needed.
The practical sequence most cosmetic dentists settle on is: diagnostic wax-up, intraoral mock-up from that wax-up, evaluate it with the patient, then prepare through the mock-up. Preparing through the mock-up means your depth cuts are measured from the surface of the planned result rather than from the existing tooth, which is what keeps reduction honest.
It also gives you a check you cannot get another way. If a depth cut through the mock-up barely touches the tooth underneath, that tooth needed almost no reduction, and now you know.
The Rule That Matters Most: Stay in Enamel
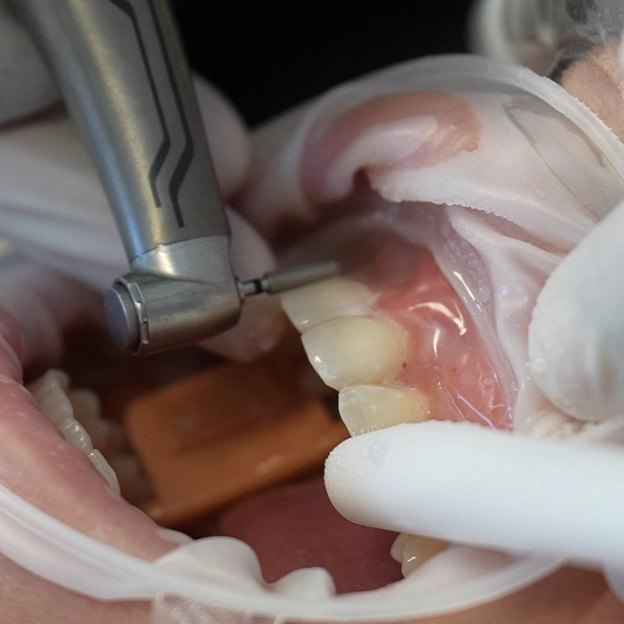
If you take one thing from this, take this.
Bonding to enamel is considerably more predictable and more durable than bonding to dentin, and veneers bonded predominantly to enamel have a strong long-term track record. Once a preparation moves substantially into dentin, bond reliability drops, sensitivity risk rises, and the margin gets harder to seal.
Enamel on anterior teeth is thinnest at the cervical third, which is exactly where over-reduction most commonly happens, because the bur wants to dig in as it follows the emergence profile. Conservative cervical reduction is not timidity. It protects the part of the preparation you most need to be enamel.
Anterior Veneer Prep: Reduction by Zone
Anterior teeth are not uniform, and reduction should not be either. Facial reduction is usually described in three zones, with the least at the gingival third and the most at the incisal third.
| Zone | Reduction | What drives it |
|---|---|---|
| Gingival third | Least | Enamel is thinnest here, and it is where over-reduction most commonly happens as the bur follows the emergence profile. It is also where the margin most needs enamel underneath it. |
| Middle third | Slightly more | Clearance through the body of the tooth is what lets the ceramist control contour instead of overbuilding it. |
| Incisal third | Most | More again toward the incisal, with additional reduction if the edge is being shortened or covered. Covering it brings the occlusion into the plan. |
Commonly taught ranges land around a few tenths of a millimeter cervically, slightly more through the body of the tooth, and more again toward the incisal. Exact figures vary between protocols and by the ceramic being used, so use the numbers your ceramist and your material actually require rather than a general figure from an article.
Two tools make this controlled rather than estimated.
Depth cutting burs create grooves at a known depth so you are reducing to a measured target instead of judging by eye. Place them through the mock-up, then join and smooth between them.
A silicone reduction guide sectioned from the wax-up lets you verify clearance at any point. Checking partway through beats discovering at the impression stage that one tooth is short.
Under-reduction causes its own problems, and they are less obvious. Insufficient clearance forces the ceramist to make the veneer too thin to mask what is underneath, or to overbuild the contour, and an overcontoured anterior veneer looks bulky no matter how good the ceramics are.
Margin Design and Placement
A defined chamfer margin is standard, giving the ceramist a clear finish line and the porcelain adequate thickness at the edge. Avoid a feathered or indistinct margin, which is difficult to read on a die and difficult to seat accurately.
On placement, equigingival or slightly supragingival margins are easier to isolate, easier to capture accurately, easier for the patient to keep clean, and kinder to the tissue over time. Where the underlying tooth is discolored, or where the case requires the margin to disappear entirely, a slight intracrevicular placement may be justified.
Treat subgingival placement as a decision with a reason rather than a default, since deeper margins mean harder isolation and isolation protects your bond. Keep the margin on enamel wherever the case allows, because a margin ending on dentin or root surface seals less well and is more likely to stain at the interface over time.
Incisal Edge and Interproximal Decisions
Two design choices deserve deliberate thought rather than habit.
The incisal design. The main approaches are leaving the incisal edge untouched, finishing at a butt joint, or covering the incisal and wrapping slightly onto the palatal. Covering the incisal gives the ceramist more control over length and edge characterization, which matters when you are lengthening teeth. It also requires more reduction and brings the occlusion into the conversation, since the porcelain now sits where the patient functions. Whichever you choose, avoid leaving unsupported enamel at the incisal edge.
The interproximal extension. How far you carry the preparation into the embrasure depends on what you are correcting. Diastema closure, significant shade change, or reshaping the outline generally require extending further so the transition is hidden. Cases where the existing form is close to target can stay conservative. Too little leaves a visible junction. Too far removes enamel you did not need.
Common Prep Mistakes
- Preparing to the tooth instead of to the plan. The most consequential error, and the one that causes most of the others.
- Over-reduction at the cervical third. Where enamel is thinnest and where the margin needs enamel most.
- Under-reduction leading to bulky contours. The ceramist cannot solve a clearance problem, only compensate for it visibly.
- Sharp line angles and a rough surface. Sharp internal angles concentrate stress in the porcelain and make seating less predictable. Every transition should be smooth and rounded, and the preparation free of gouges, which also makes it scan and photograph cleanly for the ceramist.
- Indistinct margins. The ceramist has to guess where the veneer ends.
- Ignoring occlusion when covering the incisal. The porcelain is now in function and needs to be planned for.
- Skipping the reduction guide. Checking clearance at the end is checking too late.
When Less Preparation Is the Right Answer
Not every case needs conventional preparation. Teeth that are already small, worn, retruded, or spaced may need very little reduction or none, and preparing them anyway removes enamel for no clinical benefit.
Minimal prep, no prep, and prepless approaches are a real category rather than a marketing idea, and they are only appropriate for the right case. Attempting them on teeth that are already full or protrusive produces exactly the overcontoured result they are supposed to avoid. Case selection is what separates the two outcomes, which is why the decision about how much to prepare belongs in treatment planning rather than at the handpiece. Both approaches carry CE credit when studied formally.
Key Takeaways
- Prepare to the planned result, not to the existing tooth, using a wax-up and mock-up.
- Staying in enamel is the most important factor in long-term bond reliability.
- Enamel is thinnest cervically, which is where over-reduction most often happens.
- Use depth cuts through the mock-up and verify with a silicone reduction guide.
- Under-reduction causes bulky contours the ceramist cannot fix.
- A defined chamfer at or slightly above the tissue is easier to isolate and seal.
- Covering the incisal edge gives more control but brings occlusion into play.
- Some cases genuinely need minimal or no preparation, and that is a planning decision.
Action Items
- On your next anterior case, do a wax-up and an intraoral mock-up before touching a tooth, even if you feel you could prep it without one.
- Add depth cutting burs to your veneer setup if they are not already there, and place your cuts through the mock-up.
- Make a silicone reduction guide from your wax-up and check clearance halfway through the preparation rather than at the end.
- Photograph your finished preparations for the next several cases and review them against your own margin and line angle standards. Compare them side by side.
- Ask your ceramist what minimum thickness they want for the material you are using, and prepare to that number rather than a generic one.
- Review your last few cases and note whether your margin placement was a decision or a habit.
Frequently Asked Questions
Less than most people assume, and it varies by zone and by case. Reduction is greatest toward the incisal and least at the gingival third, and a well-planned case removes only what the final contour requires. Some cases need very little.
Only when there is a reason, such as masking significant discoloration. Margins at or slightly above the tissue are easier to isolate, capture, and clean, and isolation directly affects your bond quality.
It removes less tooth structure by definition, but it is only conservative in outcome if the case suits it. On teeth that are already full or protrusive, adding porcelain without reduction produces an overcontoured result, so suitability is determined during planning.
Conclusion
Good anterior veneer prep is mostly restraint applied in the right places. Plan the result, measure reduction from that result, protect enamel especially at the cervical, and give the ceramist a clean, defined preparation. The dentists whose cases look consistently good are rarely doing something exotic at the handpiece. They are doing the planning that makes the preparation obvious.
Preparation is far easier to understand once you have watched it done and heard the reasoning at each step. The Veneer Blueprint Course covers preparation design within the full workflow, from case selection through temporaries and bonding. If your cases lean toward conservative approaches, the No Prep and Prepless Veneers Course goes deeper there, and both are outlined on the courses page.