
Content Strategy & Framework for Social Media

Let’s talk about the strategy and framework I use for my social media content.

When we create and post content for social media, I want our content to be focused and my brand and message to be clear.

My content is designed into 3 themes.

This helps give us direction with our branding and our messaging. Here are my 3 themes for my social media content.

With my content I want
#1 to show what we do,
#2 show what’s possible, and
#3 show that we are approachable.

Let’s review each theme in more detail and talk about the types of content for each category.

Theme #1 Showing what we do.

This is where we create content that shows:

Pulling back the curtain and showing what we do and how we do those things. Before and after photos and videos of smile makeovers.

Showing what happens behind the scenes. Discussing procedures and case reviews. Educational content that positions us as the expert. Showing the steps of how things are created.

Answering comments with videos.

Using the green screen feature to react to videos of our work and our cases.

Theme #2 Showing what’s possible.

This is where we create content that shows:
Smile makeover reveals New smile reaction videos.

Patient reviews and testimonials Personal stories behind a transformation Green screen reaction videos Outcome from the work we do.

Before and after photos and videos of smile makeovers. Showing how we transform people’s lives.

Theme # 3 Showing that we are approachable.

This is where we create content that shows:

Being transparent with the process and our fees. Doing funny videos. Acting with trending sounds. Showing my personal side, family, and interests. Office humor and office antics.

Reacting to popular videos or pop culture moments.

On screen reacting to a video or explaining a video, procedure, or product. Sharing advice, tips, hacks, and strategies.

These 3 themes
Showing what we do
Showing what’s possible and
Showing that we’re approachable

Helps us stay focused with our social media and has given us a framework for content creation.

Now that you know my 3 themes for content, what 3 themes would you use? What 3 themes could help articulate your vision and show off your brand?

How would you organize your content and feed?

our

3 is a good number because that represents a row on a social media feed like Instagram or TikTok. So if you ever wanted to organize your feed or “storefront,” this would be helpful to get organized.
Like in this picture you can see how our feed is organized.
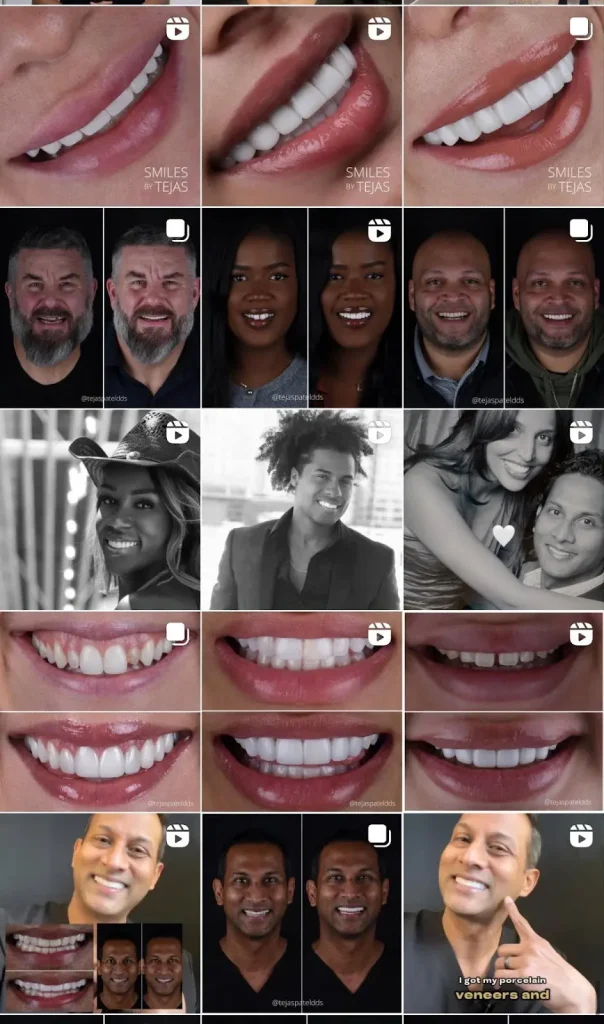
Row 1: showing what’s possible
Row 2: showing our work
Row 3: showing what’ s possible
Row 4: showing our work & what’s possible
Row 5: showing we’re approachable
Be Patient & Be Consistent on Social Media.

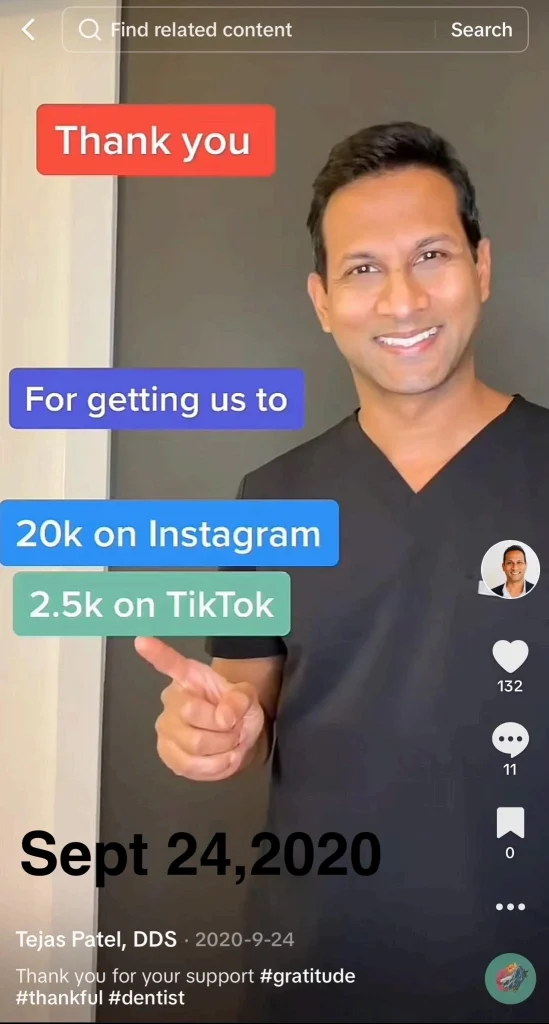
Here’s one of my social media posts from September of 2020.

It took my first 3 years of posting on Instagram and posting twice a week to grow 15k

followers.

It took the next 3 years of posting consistently from 3 to 5 times a week to grow 80k

followers on Instagram.

To date I have 2,370 posts on Instagram. That’s over 7 years.

It took 4 years of posting an average of 1-2 videos a day, and being an early adopter, and

being one of the first dentists on Tiktok, to grow over 2 Million followers on Tiktok.

To date I’ve posted 2,287 videos on Tiktok. That’s over 4 years.

Social media is a marathon and you’re playing the long game.

Give it time, be patient, and don’t give up.

Smile Design– How to determine the Size of the teeth?

Once we determine the size of the centrals that is used to determine the size of the adjacent teeth. The centrals set the tone for the smile.

Here are the steps I follow to pick the size of the teeth or the centrals.

First, I look at the preop length vs how much of the central incisors they show at rest, while speaking, and when smiling.

Photos and videos of the patient talking and smiling are helpful here.

I always measure the preop centrals as reference. Then based on how much the patient shows or doesn’t show I determine the desired length of centrals. Or if we like the length of the centrals or one of the centrals we make a note of that.

Here are some thoughts that help guide me:

– Does the patient show enough of their centrals Versus do they wish they showed more?

– Which tooth is closest to the right size and position?

– How long is too long? How short is too short?

– When the patient says “M” do they show any of the incisal edges? When they say “M” this shows the lips resting position.

The average length of centrals that we choose for waxups or the final porcelain is 9mm to 11mm.

Remember we talked about women showing 2-3mm of incisal edge when the lip is at rest, while men show 1-2 mm of their incisal edges at rest.

Another aspect of the sizing is how do we frame the smile with the lips and when the patient is smiling? We don’t always have to cover the lower teeth by 100%

When determining the size of the centrals, I like to consider the height of the patient and the existing size of the teeth. Again, that way it still looks like that person’s teeth, just better or more youthful.


If you’re a Dentist and are struggling with getting consistent results with your porcelain

veneers & smile makeovers, then check out my free training to help improve your results.

Visit https://drtejaspatel.podia.com to find out more.

Summary:

  • Dental ce courses free
  • Dental ce courses online free
  • Veneer ce course
  • Cosmetic dentistry courses online
  • Cosmetic dentistry training courses

Avoiding Issues with your Veneer Preparations

Avoid sharp edges on your veneer preps, we need to have rounded corners on our veneer preps. 

Prevent any undercuts (especially on the slice prep or deep elbow preps).   View the preps from various angles to make the sure veneer preps have a taper. 

Make sure there is sufficient reduction.  I prefer to use a reduction guide to make sure I have equal reduction.  I use a facial reduction guide and an incisal reduction guide. 

Darker preps or a crown prep next to a veneer prep.  The veneer prep may need more facial reduction if next to a crown prep.  A darker prep/ darker tooth may also require more reduction/ more preparation to help balance out the color/ shade. 

Do not have a finish line at the lingual  contact point.  It should either be above or below the contact point.

Use the slice prep to close spaces and black triangles. Get a wax up to help have the end in mind  and to plan your smile makeover cases.

Use  incisal and facial reduction guides to verify reduction. Key to facial reduction is to have 3 plane reduction, focusing on the incisal-facial third. This can help prevent show through and thin areas of the veneers.

    How veneer preparation and smile design are connected

    When doing a veneer case or any type of smile makeover, you always need to begin with the end in mind. 

    Veneer preparations are based on specific reduction requirements, BUT those requirements are based off of the end goal for the smile.  So veneer preparation is influenced by the final outcome that you and your patient have agreed upon.

    Once you understand the end goal, you then work backwards. 

    If you understand what your final smile is going to look like, then veneer preparation simply becomes making room for your restorative material. 

    This is especially important as you consider no prep, prepless, or minimal prep cases.  The concepts of smile design, understanding function,  patient goals, restorative space, esthetics,  and reverse engineering are all key in understanding veneer preparation. 

    DENTAL PHOTOGRAPHY

    One main factor that has helped grow our cosmetic practice is Dental Photography. 

    Getting good at dental photography is important in showing off your artistic skills as a cosmetic dentist.  Also, When you review photos of your work you can see where you need to improve.  This ultimately enhances your clinical work. 

    Part of growing any aspect of your dental practice is being able to show patients photos of your work.  This especially applies to cosmetic dentistry. Communicating with your lab by using photos is also essential to making your cases go smoothly.

    Patients want to look good in their photos and are more apt to share if you learn how to take good photos.  I’ve seen that patients like photos with a soft look and when the lighting isn’t so harsh.  

    As you get beautiful photos of your cases, you can build your portfolio to show prospective patients your work and also to show your before and after cases on social media. 

    Having the right equipment and the right lighting will set you up for success. 

    Here’s what I use:

    Nikon D 7500
    Nikon AF-S DX Micro NIKKOR 85mm f/3.5G Lens
    EMART 7ft Light Stand for Photography (2pk)
    Profoto A2 Monolight
    Profoto A2 Monolight
    Profoto Clic Softbox Octa
    Profoto Clic Softbox Octa
    Profoto Connect Pro Wireless Transmitter for Nikon

    Pro Tips for Dental Photography

    Make sure teeth are clean and free of debris and lipstick or dental materials.

    Give your patients a heads up and ask patients to get ready for the photo shoot.

    Use Layout or pic collage to put before and afters together.  Make sure everything is cropped the same. Make sure the eyes and teeth are level.

    Check light sources & flashes or adjust the F stop in order to avoid pictures that are too dark. 

    Have the patient sit up straight, practice taking photos with the occlusal plane level. Don’t shoot the subject by being too angled down or too angled upwards. 

    Center the target or subject in your viewfinder.

    If you’re interested in building your skills as a cosmetic dentist, keep reading….

    In My Dental Photography Course I show you how to elevate your photography to build your portfolio and showcase your work to prospective patients.

    My Online Veneer Masterclass is one of our most popular courses, and for good reason. With the virtual over-the-shoulder experience, you’ll be able to watch and learn from me as I perform three porcelain veneer cases from start to finish in real time. And the best part? It’s approved for CE credits, so you can continue to grow your knowledge while earning you CE credits.

    But that’s just the beginning. In my Social Media Masterclass, I reveal the secrets behind growing one of the biggest dental social media accounts, and how to use the platform of social media to bring in new patients.

    In my Veneer Preparation Course I outline the exact steps and sequence I use for all of my veneer preparations.  This course will help  set you up for success when prepping cases for porcelain veneers.

     And don’t forget to check out my website for free downloadable resources.  We have 3 popular resources:  the smile design webinar, the veneer steps checklist, and the smile design & lab communication checklist. These resources will give you an in-depth look at my porcelain veneer case process, to help you to ensure consistent and excellent results every time.

    So if you’re ready to take your cosmetic dentistry practice to the next level, join me in my online courses today! Visit https://drtejaspatel.podia.com to learn more and get started.

    Social Media and Veneer Procedure Videos

    One way that we have grown on social media is sharing the process and behind the scenes of dental procedures.  For our cosmetic dentistry practice, sharing veneer procedure videos online and on social media has been integral.  Porcelain veneers online videos are engaging.  There are so many steps in the porcelain veneer process that could be shared.  People are interested in what happens during the porcelain veneer process.

    From the previous smile, design, temporaries, placement of the permanent veneers, post op smile, and everything in between, people want to see what really happens.  Without being graphic, of course.  These short videos that we’ve recorded of the porcelain veneer process have been one of our best social media marketing ideas and strategies for our dental office.  As a Dentist we’re always thinking of dental posts for social media and veneer procedure videos have helped grow our dental practice.

    If you’re wanting to learn how to grow your dental practice through social media, check out our online social media masterclass at https://drtejaspatel.podia.com

    Summary:

    Veneer procedure video
    Veneers online
    Porcelain veneers online
    Social media dentistry
    Social media dental marketing ideas
    Social media marketing course
    Dental posts for social media
    Social media marketing for dental office
    Social media marketing for dental practice
    Social media marketing for dentistry
    Social media marketing strategies for dentists
    Dental posts for social media
    Dental social media ideas

    Free Cosmetic Dentistry Resources

    If you’re a Dentist and want to grow your cosmetic dentistry practice and do more porcelain veneer cases, check out some of the free downloadable checklists we offer.

    In my Porcelain Veneers Steps Checklist, I list every step we complete in our office when doing porcelain veneers from start to finish.  If you’re wondering what steps one of the Top Cosmetic dental offices follows, then check this out.

    In my smile design & lab communication checklist, I provide you with the chart  I use to document each detail about our porcelain veneer cases,  so we can ensure consistent results with our lab. I use this checklist everyday with every case we do. I use it to plan cases, design cases, during the review of the temporaries and the review of the final restorations.

    If you’re struggling with getting consistent results with your smile makeovers, then check out my free smile design webinar to help improve your results.

    If you’re a Dentist and are struggling with getting consistent results with your porcelain veneers & smile makeovers, then check out my free downloads to help improve your results.

    Visit  https://drtejaspatel.podia.com to find out more.

    Summary:

    Dental ce courses free
    Dental ce courses online free
    Veneer ce course
    Cosmetic dentistry courses online
    Cosmetic dentistry training courses

    No Preparation Veneers

    When considering No Preparation Porcelain veneers, as Dentists & Cosmetic Dentists we must begin with the end in mind. Here are some case types and conditions to consider for No Preparation Porcelain Veneers.

    No Preparation Veneers  Case Types
    small teeth
    even gaps or spaces between teeth
    teeth that are set back
    teeth are straight
    post ortho
    post invisalign
    no fillings
    no cavities
    does not show enough teeth
    good occlusion
    no major signs of wear
    wants thicker teeth
    loves the look of snap on smile
    wants bigger teeth
    wants to increase the size of teeth
    wants to build volume to the teeth

    If you’re wanting to learn more about how to do veneers, the step by step veneer process, veneer preparations, and cosmetic dentistry CE courses, , check out our online Veneer Masterclass, smile makeover resources, and CE courses at https://drtejaspatel.podia.com

    Summary:

    No Prep Veneer Course
    Dentists ce courses
    Dental veneer ce courses
    Dental veneers continuing education
    Dental ce courses
    Dentist ce courses

    Veneer Preparation Sequence

    When prepping teeth for veneers. I use the following sequence:

    Gross reduction

    • Arch form
    • Facial
    • Incisal

    Finishing

    • Verify Draw
    • Interproximal Preparation
    • Clean margins
    • Soften Corners

    Gross Reduction

    Arch form correction
    Prep the facials or linguals of the teeth that are out of the newly designed and ideal arch. I use a straight or chamfer bur to accomplish this.

    After this is complete, you should be working with fairly straighter teeth and a more uniform arch.

    Facial Reduction

    Next I like to complete the facial reduction. There are many different reduction guides you can use. I like the 0.5mm reduction bur with 2 to 3 depth guards on it.

    After this is complete, I use a thin chamfer diamond bur to complete the facial reduction and wipe away the depth markings.

    Incisal Reduction

    Oftentimes, when doing the facial reduction, you unintentionally begin to reduce the incisal edges as the facial surface gets thinner.
    I will use the verification jig we have to verify the incisal reduction before I begin this step. I may even set the handpiece to a slower setting or use a less aggressive bur. I do like the donut/ flat shaped bur to help get a straight line incisal edge reduction.

    Finishing

    Verify Draw
    Things can look different from your view versus your assistant’s view. Also, when you look from directly over the patient, the view and perspective changes.
    Once my gross reduction is done, I then stand up and lean over the patient to get a direct frontal straight view of the preps. I want to make sure no facial surfaces are sticking out and I want to make sure my preps look parallel to the desired midline.
    Take time here because it will help make your seats go easier.

    Interproximal Preparation
    Either you have a minimal prep, traditional veneer prep, slice through contact prep, or crown prep.
    We get asked the most about interproximal preps.
    If you are not breaking contacts, you need to determine how and where you want the interproximal margins. I generally think halfway or less through the contact area can work well. When prepping the interproximals you do not want to create undercuts otherwise seating the veneers will be more difficult. I usually have the bur tip slightly angled facially to help with the draw of the final veneer.
    If you do a slice prep and break the contacts, make sure you maintain good draw and taper and parallelism to help with the seating of the final veneers.

    Clean Margins
    Now that the majority of the prep is complete, I’ll refine and define all the margins that I have created. This can be done at a slower speed or with a less aggressive bur. I’ll want to make sure to tuck my facial margin slightly below the gumline (just the tip of the bur) to create a good emergence profile for the veneers.

    Soften Corners
    The last step of the prep sequence is to make sure there are no sharp corners or angles that need to be softened so as to not weaken the future veneer. I take a needle nose bur at a slower speed or an enhanced cup to achieve this.

    If you’re wanting to learn more about how to do veneers, the step by step veneer process, veneer preparations, and cosmetic dentistry CE courses, , check out our online Veneer Masterclass and smile makeover resources at https://drtejaspatel.podia.com

    Summary:
    Veneer courses dentists
    Veneer prep guidelines
    Veneer preparation course
    Veneer prep design
    Veneer steps
    Veneer prep courses
    Aesthetic dentistry courses online
    Esthetic dentistry courses online